
Automotive
Adhesive bonding and mechanical joining
Structural adhesives, self-piercing rivets, clinching and flow drill screws — the joining methods that exist because aluminium and steel cannot be spot welded together, and what each one demands of the joint design.
Standards referencedISO 4587ISO 11003-2ISO 12996ISO 14272ISO 10365
The moment a body structure mixes aluminium with steel, the spot welding gun stops being the answer. The two metals conduct heat and current quite differently, and where they do fuse they form brittle iron-aluminium intermetallics. So the industry reached for methods that join without melting anything — and found they were better in several ways that had nothing to do with aluminium.
Four ways to join without a nugget

| Method | Consumable | Access | Notes |
|---|---|---|---|
| Self-piercing rivet | Rivet | Both sides (die) | Strong, sealed on the die side, no pre-hole |
| Clinching | None | Both sides (die) | Cheapest; weaker, needs ductile material |
| Flow drill screw | Screw | One side | Closed sections, repair, service |
| Blind rivet | Rivet | One side, pre-holed | Needs an aligned hole |
A self-piercing rivet punches through the top sheet only and is driven into the bottom one against a shaped die, spreading its skirt so the lower material flows around it. The lower sheet is never penetrated, so that face stays sealed.
Clinching does the same job with no consumable at all — just a punch, a die and the ductility of the two sheets. It is the cheapest joint on the list and the weakest, especially in peel, and hard or very thin material simply splits.
Adhesives, and the direction of load
A structural adhesive is not a weaker weld spread thinly. It is a fundamentally different load path: continuous along the whole flange instead of concentrated at points.
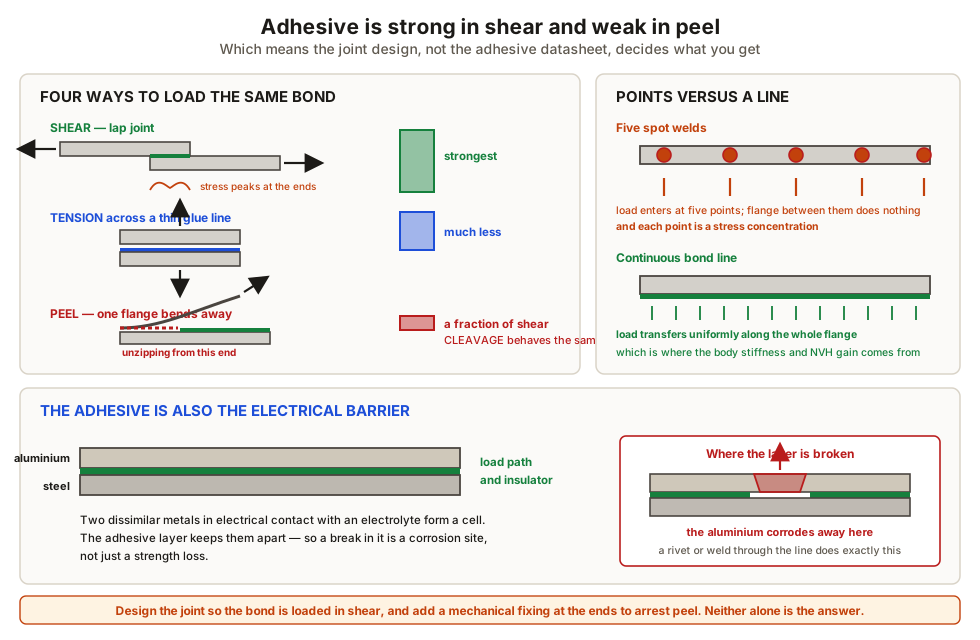
| Loading | Bond behaviour |
|---|---|
| Shear, over a long overlap | What it is designed for — uses the whole bond area |
| Tension across the glue line | Acceptable, much lower |
| Peel | Unzips from one end — design it out |
| Cleavage | Same problem, prised from one edge |
That single distinction governs most bonded joint design. A lap joint loaded in shear uses every square millimetre of bond; the same joint loaded in peel fails at a small fraction of the load, because only the material at the advancing edge is ever carrying anything.
What the bond adds beyond strength is stiffness and sealing. A row of spot welds leaves unloaded flange between the welds, and a crevice that traps moisture. A continuous bond line raises torsional stiffness and fatigue life measurably and closes the crevice.
Weld bonding — why both, always
In production the adhesive is almost never used alone. The body leaves the framing station with the adhesive uncured — it develops its strength in the paint bake oven, at 160 to 180 °C, which is why the process sequence and not the joint drawing decides the cure.
So the spot welds or rivets do two jobs: they hold everything in position until the oven, and they provide a load path that does not depend on the bond line having been perfect.
Mixed materials and the corrosion problem
The mechanism is the same galvanic couple described in steel corrosion mechanisms — only here it is designed into the structure deliberately and then managed.
What this means for the part
- Flange width still has to suit the tool: a rivet gun and its die need as much room as a welding gun, sometimes more.
- Access on both sides for rivets and clinching; plan a flow drill screw where there is only one.
- Overlap length decides bonded strength far more than adhesive choice does.
- Keep peel out of the joint with a return flange, a bead or a fastener at the end of the bond.
- Fixture through to cure. The parts are held by the mechanical joints, so those positions are structural during assembly even if the bond carries the service load.
That last point connects directly to welding distortion and fixturing, because an assembly that is held wrongly will cure into the wrong shape and stay there.
What to take away
- Aluminium and steel form brittle intermetallics when fused — join them without melting.
- Self-piercing rivets never pierce the lower sheet, so that face stays sealed.
- Clinching uses no consumable, and pays for it in peel strength and material limits.
- Flow drill screws are the one-sided answer, for closed sections and repair.
- Design adhesive joints for shear over area; peel and cleavage unzip them.
- A bond line transfers load continuously and seals the crevice a weld row leaves open.
- Adhesives cure in the paint oven, so welds or rivets hold the body until then.
- The bond is only as good as the surface — a specified oil is fine, silicone is not.
- In mixed material joints the adhesive is also the galvanic barrier.
- Overlap length matters more than adhesive grade for the strength you get.
Check your understanding
10 questions. Nothing is recorded — this is just for you.