
Civil & Structural
Structural failure analysis
How a collapse or a near miss is read backwards to its cause — the four failure signatures the steel itself leaves behind, the sequence an investigation follows before the evidence perishes, the difference between the mechanism and the cause, and why the recommendation that actually prevents recurrence is rarely a technical one.
Standards referencedEN 1993-1-10EN ISO 148-1EN ISO 6892-1BS 7910EN 1990EN 1090-2EN ISO 17637
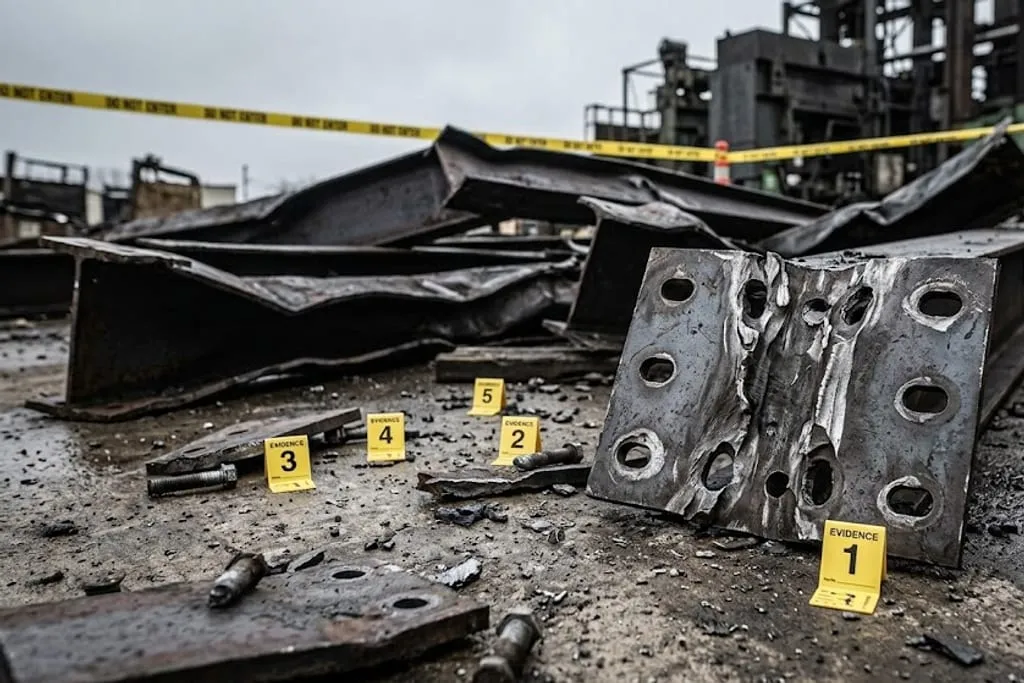
Everything in this series has been about finding problems before they become failures. This topic runs in the other direction: something has already failed, and the question is what happened and how to stop it happening again.
The discipline is worth learning even if you never investigate a collapse, because it is the same reasoning applied backwards. An inspector who understands what a brittle fracture looks like, and what conditions produce one, sees the notch and the thin cold plate differently on a routine survey.
Two different questions
Almost every unhelpful failure report confuses these:
| Question | What answers it | What it produces |
|---|---|---|
| How did it fail? | The steel — fracture faces, deformation, distortion | The mechanism: overload, fatigue, brittle fracture, buckling |
| Why did it fail? | Records, calculations, people, history | The cause: what produced the conditions for that mechanism |
The mechanism can usually be settled in a day or two. The cause takes the rest of the investigation, and a report that delivers only the mechanism has stopped halfway.
The four signatures
Ductile overload
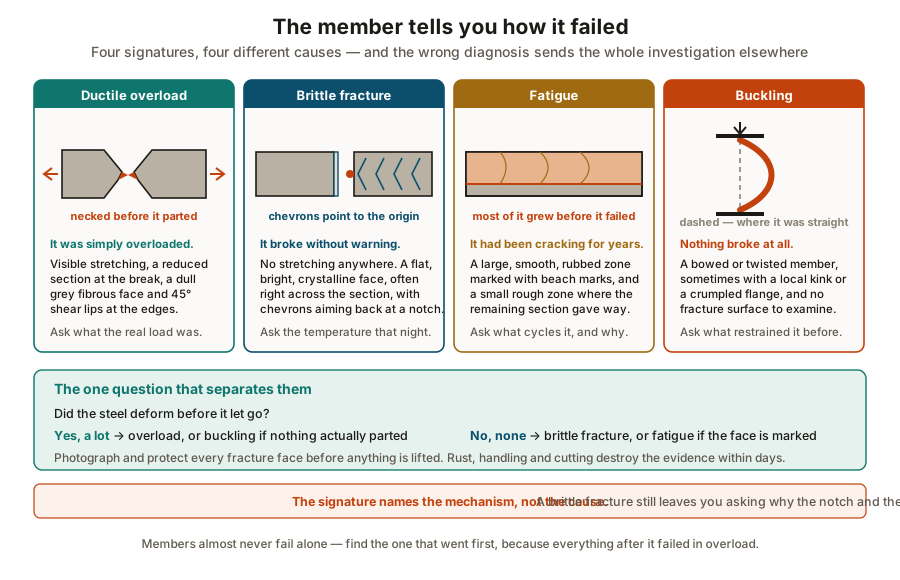
The steel yielded, stretched, necked down and tore. The break is dull and fibrous, with 45° shear lips at the edges where the final separation ran on planes of maximum shear.
This is the well-behaved failure — the structure gave warning, visibly, before it let go. It also means the material was probably fine. The investigation moves straight to loading: what was actually on the structure, and how that compares with what it was designed for. Overload failures are usually about a load nobody accounted for, or a load path that changed.
Brittle fracture
No deformation anywhere. The face is flat and bright, sometimes across the entire section, and the crack ran at close to the speed of sound in steel — there is no warning and no time to react.
Three things have to coincide: a notch or existing flaw, a tensile stress, and a material with low toughness at that temperature. Take any one away and it does not happen, which is why the investigation asks about all three — where the notch came from, what the stress was, and what the steel’s Charpy values were on the night in question.
Fatigue
Covered in detail in fatigue and fracture in steel, and its fracture face is unmistakable: a large smooth zone, often with beach marks curving away from an origin, and a small rough final zone.
The proportions carry information. A tiny final zone means the member was lightly stressed and the crack grew until almost nothing was left — the structure was patient with it. A large final zone means the applied stress was high and the crack needed to grow only a little before the remainder gave way.
Buckling
Nothing fractures. A member bows, a flange crumples, a web folds, a whole frame goes over sideways. Because there is no fracture surface, the physical evidence is geometric — the shape of the deformed member tells you which buckling mode occurred, and that points at what restraint was missing.
The questions are always about restraint: what braced this member, was the bracing actually there, was it connected, and did somebody remove it for access and not put it back. Temporary works during erection and demolition are where most buckling failures live.
The sequence an investigation follows
1 · Make it safe
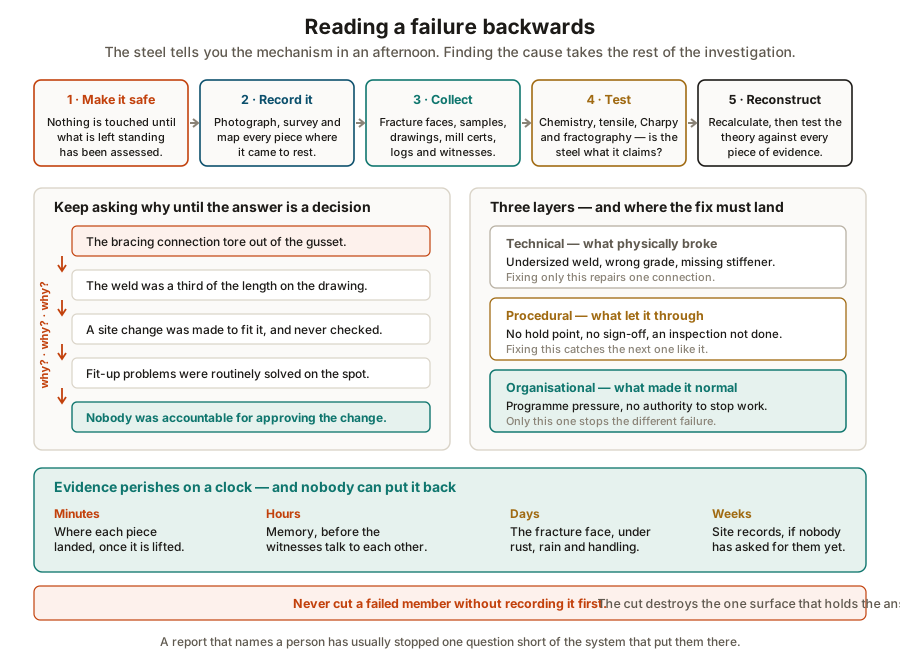
A partially collapsed structure is still carrying load through a path nobody designed. Before anyone approaches, what remains standing is assessed and, if necessary, propped or brought down under control. Investigations have produced second collapses.
2 · Record it before anything moves
The single largest cause of failed investigations is a site cleared before it was documented.
- Photograph everything, wide and close, with scale in the frame and a consistent numbering system.
- Survey the position of every significant piece where it came to rest — this is the evidence for the sequence, and it is destroyed the moment a crane hooks on.
- Mark up a copy of the general arrangement drawing with what is where.
- Photograph fracture faces in situ, then protect them. Do not clean them. Do not touch them.
3 · Collect
Physical evidence: fracture faces cut out well clear of the fracture, samples for chemistry and mechanical testing, bolts, and any material that looks wrong.
Paper evidence, which is often the harder half: as-built drawings, design calculations, mill certificates, welding procedures and welder qualifications, NDT reports, inspection release notes, change requests, maintenance records, load records, and the weather on the day.
Witness evidence, taken early and separately. People who have discussed an event with each other produce a shared account that has lost the discrepancies — and the discrepancies are the useful part.
4 · Test
Chemistry against the specified grade. Tensile testing to EN ISO 6892-1 for actual strength. Charpy to EN ISO 148-1 at the relevant temperature for toughness. Hardness surveys across a weld to reveal heat-affected-zone problems. Metallography and fractography, which distinguish fatigue from brittle fracture at magnifications the eye cannot reach, and can often identify the origin.
5 · Reconstruct
Recalculate the structure as it actually was, not as designed — measured sections, measured welds, actual loads, the real support conditions. Then test the theory against every piece of evidence, including the evidence that does not fit.
From mechanism to cause
Once the mechanism is settled, the questions stop being metallurgical. The standard approach is to keep asking why until the answer is a decision somebody made, or failed to make.
A real example of the shape it takes:
- The bracing connection tore out of its gusset plate.
- Why? The weld was about a third of the length shown on the drawing.
- Why? A site change was made to get the member to fit, and it was never checked.
- Why? Fit-up problems were routinely solved on the spot to keep the programme.
- Why? Nobody was accountable for approving a change of that kind.
Stop at step 1 and you replace a gusset. Stop at step 2 and you re-weld the connections. Only step 5 produces a change that prevents the next failure, which will not be a gusset plate at all.
| Layer | What it is | What fixing it achieves |
|---|---|---|
| Technical | The undersized weld, the wrong grade, the missing stiffener | Repairs this one location |
| Procedural | The absent hold point, the inspection not done, the unrecorded change | Catches the next one like it |
| Organisational | Programme pressure, unclear authority, no power to stop work | Stops the different failure too |
Writing the report
The value of an investigation is entirely in what it changes. A few things separate reports that change something from reports that get filed:
- Separate fact from inference, visibly. What was measured and observed goes in one place; what is concluded from it goes in another. A reader must be able to disagree with your reasoning while still using your data.
- State the confidence. Some conclusions are certain, some are the best available explanation. Say which is which — an overstated conclusion is challenged and the whole report loses standing.
- Make recommendations that name an owner and a deadline. “Improve change control” changes nothing. “No dimensional change to a connection may be made on site without written approval from the design engineer; revise procedure QP-14 by 31 March; owner: construction manager” does.
- Say what you could not establish. Evidence that was destroyed, records that did not exist, witnesses unavailable. This is not weakness — it is often the most actionable finding in the document, because missing records are themselves a failure of the system.
Near misses are the cheap version
A near miss delivers the same information as a failure, with the evidence intact, nobody injured and no programme lost. A bolt found sheared. A crack found at an inspection. A member found without the bracing on the drawing. Each is a failure that did not complete.
Organisations that investigate near misses with the same seriousness as failures find causes years earlier and at a fraction of the cost. Organisations that treat them as good luck get the full version eventually.
Takeaways
- Mechanism and cause are different questions. The steel answers the first; records, calculations and people answer the second.
- The four signatures split on one observation: did the steel deform before it let go? Overload and buckling yes, brittle fracture and fatigue no.
- Chevrons point back to the origin, and the origin is where the notch, flaw or weld defect that started everything will be found.
- Evidence perishes on a clock — position in minutes, memory in hours, fracture faces in days. Record before anything is moved, and cut well clear of the fracture.
- In a multi-member collapse, find the one that failed first. Everything after it failed in overload and tells you little.
- Keep asking why until the answer is a decision. A technical fix repairs one location; a procedural fix catches the next one.
- Near misses carry the same information as failures, with the evidence intact and nobody hurt.
This closes the Civil and Structural series on steel inspection. Start again at structural inspection and repair for the survey workflow, or take the fatigue and fracture in steel topic next if the detail categories are what you need.
Check your understanding
10 questions. Nothing is recorded — this is just for you.